
Gilbert ADU Contractor
Gilbert is known for his flexibility when it comes to construction budgets. He understands that every project is unique and has its own set of challenges, and he works closely with clients to find solutions that meet their needs and fit within their budget. Gilbert is skilled at finding cost-effective alternatives and negotiating with suppliers to get the best possible prices. He is committed to delivering high-quality work at a fair and reasonable cost, and his clients appreciate his ability to stay within budget while still delivering excellent results.
Project By Gilbert
We will be meticulously documenting each and every step of the construction process for a new 1,200 sqft ADU. Gilbert has a limited time remaining to complete the ADU, but we remain optimistic that he will meet the deadline. To stay informed on the progress of the project and to be among the first to know whether Gilbert meets his deadline, we invite you to join our mailing list.
-
New Construction 1,200 Sqft
-
Cost $245,000 plus plans and city fees. $204 per square foot.
-
Raised foundation
-
2 Bed 2 Bath
-
Vaulted Ceiling
-
All Electric
-
Solar Panel required (Paid separately)
1,200 SQFT ADU 360 Tour
ADU
CONSTRUCTION
TIMELINE
Gilbert broke ground on this project in November 2022. The homeowner had their plans ready and were taking bids. The highest bid came in at $400,000. There was a bid lower than Gilbert's. However, Gilbert managed to secure the project coming in at $245,000.


11/5/2022
Plumbing
After grading, the installation of the rough plumbing was the next step. The sewer line connection from the front yard to the ADU is approximately 110ft. Both the sewer and water line were installed in the same trench."

NEED AN ESTIMATE?
-
Suppose you are in the bidding process and looking for a contractor to build your ADU. Book an appointment and contact Gilbert.


11/27/2022
RAISED FOUNDATION
This involves grading the ground to ensure that it is level or filling in low spots with soil to create a stable base for the house. Next, the foundation for the house was built. This involves pouring concrete footings and setting the foundation walls. The footings are 18" deep and 18" above ground.
12/14/2022
SUBFLOOR & INSULATION
Once the foundation is complete. The next step was to build the floor system. This usually starts with installing a ledger board along the bottom of the foundation walls. The ledger board is a horizontal piece of lumber to which the floor joists will be attached. These are the horizontal structural members that support the floor. They are typically spaced 16 inches or 24 inches apart,


12/18/2022
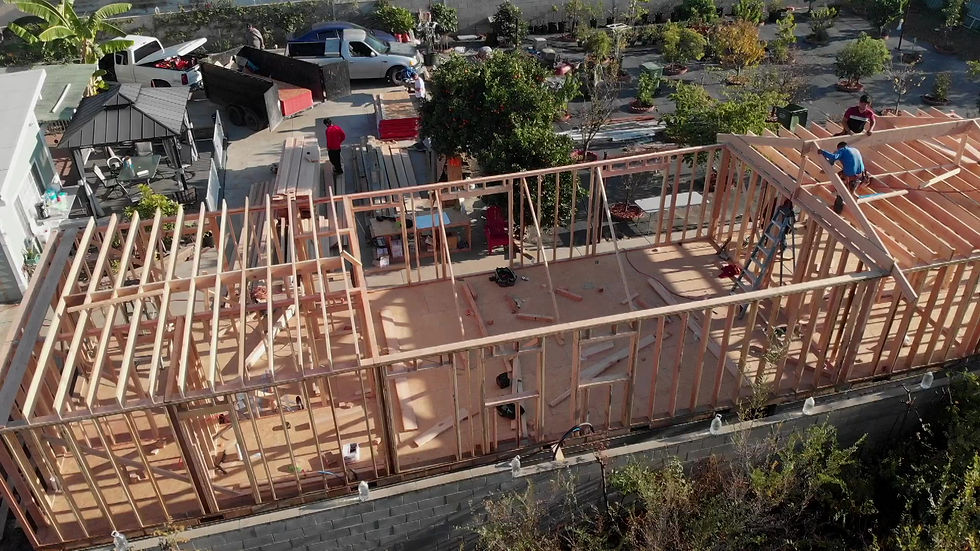
FRAMING
Once the floor was complete, building the wall frames was the next step. This involves standing up the wall studs and attaching them to the top and bottom plates and any intermediate plates that may be required. After the walls are framed, the roof trusses are installed. These are the structural components that support the roof, and they are usually made of wood or steel
1/3/2023
FRAMING COMPLETED
After framing, the next step was to install the roof. This involves constructing the roof trusses, which are the structural components that support the roof, and then installing the roof decking, which is the layer of material that forms the actual surface of the roof. Once the roof is complete, the next step will be to install the rough electrical and plumbing.


1/7/2023
ROOF
After the roof decking was in place, the underlayment was installed, which is a layer of material that goes under the roofing material and helps protect the roof from the elements. The next step was to install the roofing material itself, which could be asphalt shingles, metal, tile, or another type of material.
1/13/2023
FIRE SPRINKLER SYSTEM
The ADU is not located near a fire hydrant; therefore, a Fire Sprinkler system must be installed. It was a requirement made by the city of Whittier before plan approval. Each room will have two fire sprinklers, and the living room will have 4.


2/10/2023
INSULATION
Per title 24 the ADU features R15 on the wall and R30 on the ceiling. To install insulation for a new house construction, you need to determine the type of insulation, plan the installation, cut and install the insulation, seal gaps, insulate the attic and crawl spaces, and test the insulation. Proper insulation is crucial for an energy-efficient and comfortable home, and following these steps will ensure a well-insulated and efficient new house construction.
2/10/2023
ASPHALT-SATURATED PAPER AND LATH
Lath is a construction material used for creating a base layer for plaster or stucco on walls. To install the lath, you need to plan the installation, prepare the surface, install the lath rows, cut and shape the lath, bend it at corners, apply the plaster or stucco, and finish the surface as desired. The process requires precision and attention to detail to ensure a long-lasting, durable finish.


2/16/2023
DRYWALL
The drywall installation process has commenced and is anticipated to be completed in a few days' time. Prior to the mud and taping stage, a screw inspection will be conducted to ensure that the appropriate screws were used during the installation process.
2/23/2023
STUCCO
The installation process for stucco involves preparing the surface, applying a scratch coat, followed by a brown coat, and a final finish coat. The stucco is then allowed to cure before it can be painted or finished. It's important to note that the process may vary depending on project requirements and stucco materials used, and professional guidance is recommended.


Rain
-
The historic California raining season slowed down the construction process but the ADU is almost done

3/22/2023
KITCHEN CABINETS
The process of installing kitchen cabinets involves planning and measuring the space, installing a level base, marking the position of each cabinet, installing the upper cabinets first, then the lower cabinets, adding any additional components like drawers and shelves, and finally attaching any trim or hardware. It's important to follow the manufacturer's instructions and take appropriate safety measures while doing so. Having a helper can make the process easier, especially when lifting and positioning the cabinets.


